Tuesday 23 April 2019

I'm back and starting to pull my powerwall back again.

I've been experiencing some issues as i foolishly shut it all down completely over the winter but there must have been some parasitic draw from a device and it get extremely low and i have resurrected it however one cell is low and has been getting to around 2v during the night so the powerwall is going to be pulled down and rebuilt i think, going for a different design this time.

I previously used Paul Kennets design which was a 24p packs which were then put in parallel with 3 other packs to create a 96p pack however this has a lot of interconnects so i think going for big 80p packs as many others have done shall be the best way forward.  To do this however i will need to strip all the cells out and retest everything and leave them for a few weeks to test for self discharge and then use repackr to assemble.

That is a lot of work!!!

Tuesday 20 June 2017

Epever/Epsolar output to InfluxDB/Grafana

I setup reporting for my EPever solar charge controller a while ago using  using the following guide at sporadic projects.  It works but have been hankering for something a little more/different and saw a posting recently of someone using grafana and influxdb to report on their PIP based solar setup so i set about recreating this and in all honesty it wasn't as bad as i thought and after a few days i've gotten something up and running.


The first step was setting up my pi, i decided to reuse a aging pi1 which caused some issues as i couldn't install things from the standard repo's so it needed a little more tinkering.  I documented this as i went so i hope this helps others using it on a pi1 also.

The below shall download a precompiled influxdb setup and install it.  It will then add a custom repo to your sources list and install grafana and then start it up and enable it at startup.  Lastly it shall install php and the curl library for php and then install the influxdb library for php using composer.  Socat is optional but if your using one of my rs485 to wifi devices you shall need it to connect to the serial port over the network, if your using a physical connection you can update the code accordingly with the correct serial port.

wget https://dl.influxdata.com/influxdb/releases/influxdb_1.2.0_armhf.deb
sudo dpkg -i influxdb_1.2.0_armhf.deb

echo "deb https://dl.bintray.com/fg2it/deb-rpi-1b jessie main" | sudo tee -a /etc/apt/sources.list.d/grafana.list
sudo apt-get update
sudo apt-get install grafana

sudo /bin/systemctl daemon-reload
sudo /bin/systemctl enable grafana-server
sudo /bin/systemctl start grafana-server

sudo apt-get install socat

sudo apt-get install php5-fpm
sudo apt-get install php5-curl

So you can get to the influxdb web interface you need to first enable it with the below.
sudo nano /etc/influxdb/influxdb.conf
Change enabled = false to enabled = true under the [admin] section.

Next you need to conenct to the wifi serial adaptor so this is done using socat which we installed earlier
sudo socat pty,link=/dev/ttyUSB21,unlink-close=0,raw,echo=0 tcp:WirelessDeviceIPAddress:23&
sudo chmod 777 /dev/ttyUSB21


Once this is done you shall need to launch a web browser and go to

http://IP of your Pi:8083/

from here you can create a db called powerwall, it's self explanatory and very easy.  Then create a user called root with password root for the DB, i created it as an admin but that is optional.

Once you have done this you shall need to go to the web interface of the new grafana installation at the following address

http://IP of your Pi:8083

From here you configure the datasource as per below


Once this is done the database and grafana initial configuration is done.  You now need to download a few files from github.  I use the php library which toggio kindly wrote which made this possible, i'd say easier but possible is a more honest answer.

https://github.com/toggio/PhpEpsolarTracer
https://github.com/chickey/Epever-influxdb

Place the files into one directory together and run

php logger.php

If it works it should print out the current realtime and statistical information.  If you receive a could not connect error then please check that socat is still running correctly, i find it can drop out for.  If it's working ok then put it into crontab to run as frequently as required.

Lastly you then need to go back to grafana and start to create some dashboards which is simple and very wyswig.  If you want/need an example let me know and i can upload my dashboard.

Tuesday 16 August 2016


I've two solar charge controllers from EPsolar or EPever as they are sometimes known. They are great and have a COM port for monitoring the performance of the panels and state of the battery etc but it's a pain to drag the laptop out and hook things up just to check the status. The COM port is a RJ45 port which uses the RS485 standard so i investigated commercial offerings but they were extremely expensive and as this was just to make things convenient for a personal home product i didn't fancy paying £50 out for the


I began to investigate doing this myself and using some off the shelf components and custom firmware from the guys at esp-link i was able to come up with the design you can see in the picture.


I've made both a instructable available here and also a set of YouTube videos on the procedure.


http://www.instructables.com/id/Wireless-Solar-Charge-Controller-Monitor-RS485-to-/


http://www.youtube.com/c/ColinHickey1

Tuesday 20 October 2015

Hi guys, I've kindly been sent a new gadget to have a look at by a company called 1byone in the form of a LED bluetooth controller bulb that also has a bluetooth speaker built in.  I plan to integrate this with the blinkybox toy i made for my kids so that they shall be able to control the room lighting as well as the colour of the box itself.

You can get the product here Link and I've put up a short video of it in action link.  I'm going to do a full review of it soon as well as a video when it's integrated with blinky box :-)
I did have to purchase an adapter separately for it to work in a standard baynet B22 socket (UK style) but it was only 72p link

They also have a promotion on a couple of other items which would be great for a party, a smoke machine Link as well as a sound activated stage light which again would be excellent for a kids Halloween party Link.  Lastly they have a deal on iphone 6 cases link

Tuesday 13 October 2015

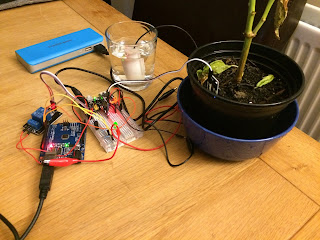
Been doing some more electronics tinkering and put up an instructable of a self watering plant pot using a small 6v motor and an arduino to control it via a relay. I've put together a short YouTube video with it as well, i really need to work on my camera skills, more specifically the lighting as i think that's really affecting it. The instructable is here Let me know what you think and any suggestions would be really appreciated even if it's criticism.


Wednesday 23 September 2015

Blinkybox

Been bitten by the electronics bug lately and built a small lightup toy for my little ones which i've documented at Instructables for those who fancy having a go at it themselves.  I've been amassing components so plan many more builds.