Hi guys, I've kindly been sent a new gadget to have a look at by a company called 1byone in the form of a LED bluetooth controller bulb that also has a bluetooth speaker built in. I plan to integrate this with the blinkybox toy i made for my kids so that they shall be able to control the room lighting as well as the colour of the box itself. You can get the product here Link and I've put up a short video of it in action link . I'm going to do a full review of it soon as well as a video when it's integrated with blinky box :-) I did have to purchase an adapter separately for it to work in a standard baynet B22 socket (UK style) but it was only 72p link They also have a promotion on a couple of other items which would be great for a party, a smoke machine Link as well as a sound activated stage light which again would be excellent for a kids Halloween party Link . Lastly they have a deal on iphone 6 cases link
Posts
- Get link
- X
- Other Apps

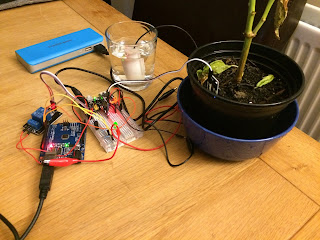
Been doing some more electronics tinkering and put up an instructable of a self watering plant pot using a small 6v motor and an arduino to control it via a relay. I've put together a short YouTube video with it as well, i really need to work on my camera skills, more specifically the lighting as i think that's really affecting it. The instructable is here Let me know what you think and any suggestions would be really appreciated even if it's criticism.
Building your own Steam Box
- Get link
- X
- Other Apps
Never thought i'd see the day but i have actually gotten to the point where i prefer to use a controller than the keyboard and mouse, i can only say that i must be getting old! I've went with a Dell Optiplex 790 paired up with a KFA2 GeForce GTX 750Ti OC "Low Profile" which i have to say I've been mightily impressed with, as it didn't come with a low profile bracket i had to purchase one. I threw in a SSD which i had lying about and it's been fantastic, it was only 128GB so I've just purchased a 512GB SSD but i'm mightily impressed with it. I use a cheap xbox 360 wireless adaptor which i purchased from Amazon Link that works great, it's a pain to find the 64 bit drivers but once that is sorted it's just a case of firing up steam in big picture mode and your all sorted.
Plex Client on Raspberry Pi
- Get link
- X
- Other Apps
I've got myself a Raspberry pi so i'm attempting to compile plex media center for it. I'm doing this blog entry for personal reference more than anything but shall come back and keep things updated with what I've done so far and how successful i am. git clone git@github.com:gewalker/plex-linux.git cd plex-linux git submodule init git submodule update sudo apt-get install automake build-essential autoconf autopoint libtool libboost1.46-all-dev libx11-dev libgl1-mesa-dev libxrender-dev portaudio19-dev libavcodec-dev libavformat-dev libswscale-dev libavdevice-dev libglew1.6-dev libmad0-dev libsamplerate-dev libogg-dev libvorbis-dev libbz2-1.0 libbz2-dev libwavpack-dev libmpeg2-4-dev libfribidi-dev libsqlite3-dev libpng-dev libpcre3-dev libcdio-dev libmysqlclient-dev libmodplug-dev libfaad-dev libflac-dev libsmbclient-dev libsdl-mixer1.2-dev libxt-dev libxtst-dev libxmu-dev libxinerama-dev libcurl4-gnutls-dev libdbus-1-dev libhal-storage-dev libhal-dev libpulse-dev...
Compiling ABGX360 on a Seagate Dockstar
- Get link
- X
- Other Apps
This is a really useful app and wanted to install it on my dockstar, after some digging i found out it can be compiled successfully and it works great. I've created a script which installs the required pre-requisites and then compiles the program and creates a hidden folder under /root called .abgx360 and moves the file there. The script can be downloaded and run by running the following cd /tmp wget " http://shne02559.pwp. blueyonder.co.uk/deb-abgx.sh " chmod +x deb-abgx.sh ./deb-abgx.sh The packages i found i required were libcurl4-openssl-dev zlib1g-dev build-essential libwxgtk2.8-dev If anyone knows different I'd love to hear from you as i like to keep the number of packages i have installed on the box to a minimum. I plan on creating a post download script for sabnzbd to invoke abgx360 if i get time as it would be handy to have a report created in the directory automatically. I'll post this as soon as i get around to it.
Installing episode butler and sabnzbd on the Seagate Dockstar.
- Get link
- X
- Other Apps
As i've mentioned i've gotten myself a nice Dockstar with the intention of running sabnzbd as well as episode butler. I currently have a WHS running which works well but i've always been concerned about power usage even if it is an Atom board so have decided to go the ultra low power route which i don't mind running constantly. I've had to rebuild the dockstar a few times so thought i'd create a script to make life much easier. I'm assuming that you've followed the excellent guide from Jeff at link i've used this a few times now and it's worked excellently. The only thing which caught me out was forgetting to set the boot partition as active. Anyway down to the interesting stuff, if you run the following commands on your newly setup debian dockstar you will end up with a vanila install of sabnzbd as well as episode butler. cd /tmp wget " http://shne02559.pwp. blueyonder.co.uk/epinstall.sh " chmod +x epinstall.sh ./epinsta...
